This article is above the usual level I write for in this blog, but I feel it needs to be written and at the moment can’t find a particular forum to write it in, so here it is.
Windows 7 has, under Backup and Restore in the control panel, the built-in ability to create an image of your hard disk. That means it takes a snapshot of your operating system, all the files you have, etc. in a compressed file that can be used at a later point to restore the computer to the state it was in when the image was created. This is not dissimilar to the contents of the “recovery partition” many computers come with these days. It goes one step further than System Restore in that it is a complete image of the computer’s hard disk, or one of its partitions.
I have, in my test machine, a 1.5 Tb hard disk. Because it’s a test machine, I wanted to use the image creation ability of Windows 7 so I didn’t have to re-install the operating system from scratch every time I wanted to take the computer back to its original configuration, or an earlier configuration in general, after testing some new software (especially malware protection software). So I created the main partition where the operating system is, and then 5 additional partitions, one physical and 4 logical, to accommodate up to 5 images of the main partition. So 7 partitions total: the main partition, 5 additional ones, and the small, system-reserved, 100 Mb partition Windows 7 creates when installing.
Everything was going according to plan. I created the first image right after installing the OS and the MoBo drivers, second one after installing all Windows updates and Windows XP mode, etc. A total of 5 different images at different stages of the system. But after restoring several times, when I tried to re-create the most recent image after making a small modification, I got an error stating that the image could not be created because there wasn’t enough space, as you can see here:

Careful readers will notice the syntax mistake (“Make sure that, for all volumes to be backup up…”). But anyways, the important datum is, I did have more than enough space in the destination partition, so what’s up? I googled and found the answer: somehow the system reserved partition, the 100 Mb one, had decreased in available space, and now it only had about 30 Mb free. Per the message above, partitions with less than 500 Mb need to have at least 50 Mb of free space. So now I know what the error’s cause is. But how do I resolve it without deleting that partition?
I could try assigning the partition a letter and then accessing it, try to change permissions so I could delete files, etc. But which files to delete? Generally speaking deleting files from a system reserved partition is not a good idea.
The answer is simple, in my case anyways. I had the earlier images and I had the original Windows 7 DVD, and that’s all I needed. I booted from the DVD, deleted the reserved small partition, reinstalled Windows 7 from scratch (at which point it created a new system reserved partition) and then once install was complete, I restored the latest image available for the main partition. Then made the small tweaks I wanted to save and created a new image. Worked like a charm. The newly created small reserved partition was now more than 50 Mb free so no more error message when creating the system image.
HTH.
Update:
Found this when searching again for the error code:
“A Workaround Without Repartitioning:
When trying to make a system image of Windows 7, I got error 0x80780119. After searching this thread (plus others), I found my 100 MB System Reserved partition had grown a large USN journal. I assigned it drive letter F:\.
Fsutil usn queryjournal F:
Then I ran this command to clear and disable the USN journal on my System Reserved partition:
fsutil usn deletejournal /N /D F:
This freed 48 MB. The USN journal on my System Reserved partition remained disabled after a reboot, which I verified by re-running the query. Subsequently, I was able to make a system image without error.”
Link for above workaround: http://social.technet.microsoft.com/Forums/en-US/w7itprogeneral/thread/fce6950d-c06d-4dd0-a850-67022db4fe04/
While the above might have worked for some, if the space used by the USN journal is not enough to give the partition at least 50 Mb of free space, the workaround won’t work.
It’s probably better to create a new primary partition and make it the system volume, as covered in the above thread, that is:
1. Choose where you want to have your system volume. Few things you need to keep in mind:
a. System volume can only be created on a primary partition of MBR disk.
b. If system volume & boot volume are together, then BitLocker feature cannot be used to encrypt volumes on your machine.
2. Suggest creating a new volume (say F:) on the same disk that contains the boot partition of size of about 490 MB (be careful to keep it less than 500 MB).
3. Assuming Windows 7 is installed on C: on your machine. From an elevated command-prompt run: bcdboot.exe C:\Windows /s F:
4. From elevated command-prompt run: DISKPART
5. From the disk part command-prompt:
DISKPART> select volume F
DISKPART> active
6. Restart
Notice that the original posting in the forum thread has the command in step 3 as “bcdboot.exe /s C:\Windows /s F:”. That’s incorrect, the first “/s” switch should not be there.
Note: If you follow the above steps you will loose the ability to boot into the recovery environment from your hard disk, i.e. the “Repair your computer” option, normally on top when trying to boot into safe mode, will not be there anymore. Since one can either 1) use the original Windows 7 DVD or 2) Use a recovery disk created at the time the system image was created to get into the this recovery environment, this is not a big deal. But you should aware of it, so that you can at least create a recovery disk if you don’t have it and don’t have an original Windows 7 DVD. However, when I followed these steps, I was able to have the bigger system volume AND the Repair Your computer option at F8:
1. Export the BCD store. From an elevated command prompt do bcdedit /export [filename]
2. Do the steps 1-6 above. Notice there is no repair option at F8.
3. Import the BCD store, from an elevated command prompt with bcdedit /import [filename]
4. Restart.
5. Conditional: When restarting if you notice an error that won’t allow you to boot, that looks like this:
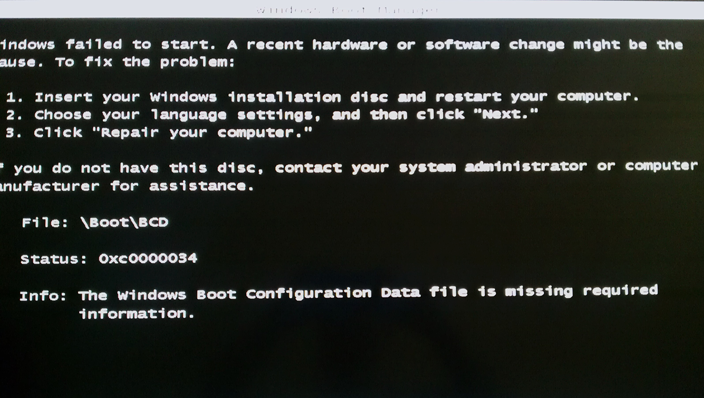
If and only if you see an error like that, insert the Windows 7 DVD and get to the Repair my computer section. Choosing that will automatically detect, make repairs and restart (This error message may specifically occur if afterwards you delete the original 100 Mb partition, even though it’s not the active partition anymore. You don’t need to delete it. And you can always revert to using it as the active partition).
6. You will notice you have the new bigger system volume as the active one AND F8 at booting includes the Repair my computer option.
This is what the BCD store looked like originally:
Windows Boot Manager
--------------------
identifier              {bootmgr}
device                  partition=\Device\HarddiskVolume1
description             Windows Boot Manager
locale                  en-US
inherit                 {globalsettings}
default                 {current}
resumeobject            {7378d097-b723-11e0-a59f-c12e7e982394}
displayorder            {current}
toolsdisplayorder       {memdiag}
timeout                 30

Windows Boot Loader
-------------------
identifier              {current}
device                  partition=C:
path                    \Windows\system32\winload.exe
description             Windows 7
locale                  en-US
inherit                 {bootloadersettings}
recoverysequence        {7378d099-b723-11e0-a59f-c12e7e982394}
recoveryenabled         Yes
osdevice                partition=C:
systemroot              \Windows
resumeobject            {7378d097-b723-11e0-a59f-c12e7e982394}
nx                      OptIn

Windows Boot Loader
-------------------
identifier              {7378d099-b723-11e0-a59f-c12e7e982394}
device                  ramdisk=[C:]\Recovery\7378d099-b723-11e0-a59f-c12e7e982394\Winre.wim,{7378d09a-b723-11e0-a59f-c12e7e982394}
path                    \windows\system32\winload.exe
description             Windows Recovery Environment
inherit                 {bootloadersettings}
osdevice                ramdisk=[C:]\Recovery\7378d099-b723-11e0-a59f-c12e7e982394\Winre.wim,{7378d09a-b723-11e0-a59f-c12e7e982394}
systemroot              \windows
nx                      OptIn
winpe                   Yes

Resume from Hibernate
---------------------
identifier              {7378d097-b723-11e0-a59f-c12e7e982394}
device                  partition=C:
path                    \Windows\system32\winresume.exe
description             Windows Resume Application
locale                  en-US
inherit                 {resumeloadersettings}
filedevice              partition=C:
filepath                \hiberfil.sys
debugoptionenabled      No

Windows Memory Tester
---------------------
identifier              {memdiag}
device                  partition=\Device\HarddiskVolume1
path                    \boot\memtest.exe
description             Windows Memory Diagnostic
locale                  en-US
inherit                 {globalsettings}
badmemoryaccess         Yes

EMS Settings
------------
identifier              {emssettings}
bootems                 Yes

Debugger Settings
-----------------
identifier              {dbgsettings}
debugtype               Serial
debugport               1
baudrate                115200

RAM Defects
-----------
identifier              {badmemory}

Global Settings
---------------
identifier              {globalsettings}
inherit                 {dbgsettings}
                        {emssettings}
                        {badmemory}

Boot Loader Settings
--------------------
identifier              {bootloadersettings}
inherit                 {globalsettings}
                        {hypervisorsettings}

Hypervisor Settings
-------------------
identifier              {hypervisorsettings}
hypervisordebugtype     Serial
hypervisordebugport     1
hypervisorbaudrate      115200

Resume Loader Settings
----------------------
identifier              {resumeloadersettings}
inherit                 {globalsettings}

Device options
--------------
identifier              {7378d09a-b723-11e0-a59f-c12e7e982394}
description             Ramdisk Options
ramdisksdidevice        partition=C:
ramdisksdipath          \Recovery\7378d099-b723-11e0-a59f-c12e7e982394\boot.sdi
This is what it looked like after changing the active partition to the bigger system volume and restarting:
Windows Boot Manager
--------------------
identifier              {bootmgr}
device                  partition=D:
description             Windows Boot Manager
locale                  en-us
inherit                 {globalsettings}
default                 {current}
resumeobject            {d8d48f96-b71d-11e0-b6d6-a887e08237b0}
displayorder            {current}
toolsdisplayorder       {memdiag}
timeout                 30

Windows Boot Loader
-------------------
identifier              {current}
device                  partition=C:
path                    \windows\system32\winload.exe
description             Windows 7
locale                  en-us
inherit                 {bootloadersettings}
osdevice                partition=C:
systemroot              \windows
resumeobject            {d8d48f96-b71d-11e0-b6d6-a887e08237b0}
nx                      OptIn
detecthal               Yes

Resume from Hibernate
---------------------
identifier              {d8d48f96-b71d-11e0-b6d6-a887e08237b0}
device                  partition=C:
path                    \windows\system32\winresume.exe
description             Windows Resume Application
locale                  en-us
inherit                 {resumeloadersettings}
filedevice              partition=C:
filepath                \hiberfil.sys
debugoptionenabled      No

Windows Memory Tester
---------------------
identifier              {memdiag}
device                  partition=D:
path                    \boot\memtest.exe
description             Windows Memory Diagnostic
locale                  en-us
inherit                 {globalsettings}
badmemoryaccess         Yes

EMS Settings
------------
identifier              {emssettings}
bootems                 Yes

Debugger Settings
-----------------
identifier              {dbgsettings}
debugtype               Serial
debugport               1
baudrate                115200

RAM Defects
-----------
identifier              {badmemory}

Global Settings
---------------
identifier              {globalsettings}
inherit                 {dbgsettings}
                        {emssettings}
                        {badmemory}

Boot Loader Settings
--------------------
identifier              {bootloadersettings}
inherit                 {globalsettings}
                        {hypervisorsettings}

Hypervisor Settings
-------------------
identifier              {hypervisorsettings}
hypervisordebugtype     Serial
hypervisordebugport     1
hypervisorbaudrate      115200

Resume Loader Settings
----------------------
identifier              {resumeloadersettings}
inherit                 {globalsettings}
This is what it looked like after importing the original BCD store and restarting:
Windows Boot Manager
--------------------
identifier              {bootmgr}
device                  partition=F:
description             Windows Boot Manager
locale                  en-US
inherit                 {globalsettings}
default                 {current}
resumeobject            {7378d097-b723-11e0-a59f-c12e7e982394}
displayorder            {current}
toolsdisplayorder       {memdiag}
timeout                 30

Windows Boot Loader
-------------------
identifier              {current}
device                  partition=C:
path                    \Windows\system32\winload.exe
description             Windows 7
locale                  en-US
inherit                 {bootloadersettings}
recoverysequence        {7378d099-b723-11e0-a59f-c12e7e982394}
recoveryenabled         Yes
osdevice                partition=C:
systemroot              \Windows
resumeobject            {7378d097-b723-11e0-a59f-c12e7e982394}
nx                      OptIn

Windows Boot Loader
-------------------
identifier              {7378d099-b723-11e0-a59f-c12e7e982394}
device                  ramdisk=[C:]\Recovery\7378d099-b723-11e0-a59f-c12e7e982394\Winre.wim,{7378d09a-b723-11e0-a59f-c12e7e982394}
path                    \windows\system32\winload.exe
description             Windows Recovery Environment
inherit                 {bootloadersettings}
osdevice                ramdisk=[C:]\Recovery\7378d099-b723-11e0-a59f-c12e7e982394\Winre.wim,{7378d09a-b723-11e0-a59f-c12e7e982394}
systemroot              \windows
nx                      OptIn
winpe                   Yes

Resume from Hibernate
---------------------
identifier              {7378d097-b723-11e0-a59f-c12e7e982394}
device                  partition=C:
path                    \Windows\system32\winresume.exe
description             Windows Resume Application
locale                  en-US
inherit                 {resumeloadersettings}
filedevice              partition=C:
filepath                \hiberfil.sys
debugoptionenabled      No

Windows Memory Tester
---------------------
identifier              {memdiag}
device                  partition=F:
path                    \boot\memtest.exe
description             Windows Memory Diagnostic
locale                  en-US
inherit                 {globalsettings}
badmemoryaccess         Yes

EMS Settings
------------
identifier              {emssettings}
bootems                 Yes

Debugger Settings
-----------------
identifier              {dbgsettings}
debugtype               Serial
debugport               1
baudrate                115200

RAM Defects
-----------
identifier              {badmemory}

Global Settings
---------------
identifier              {globalsettings}
inherit                 {dbgsettings}
                        {emssettings}
                        {badmemory}

Boot Loader Settings
--------------------
identifier              {bootloadersettings}
inherit                 {globalsettings}
                        {hypervisorsettings}

Hypervisor Settings
-------------------
identifier              {hypervisorsettings}
hypervisordebugtype     Serial
hypervisordebugport     1
hypervisorbaudrate      115200

Resume Loader Settings
----------------------
identifier              {resumeloadersettings}
inherit                 {globalsettings}

Device options
--------------
identifier              {7378d09a-b723-11e0-a59f-c12e7e982394}
description             Ramdisk Options
ramdisksdidevice        partition=C:
ramdisksdipath          \Recovery\7378d099-b723-11e0-a59f-c12e7e982394\boot.sdi
Finally this is what it looked like when I deleted the original partition, restarted, repaired it with the Win 7 DVD and restarted again:
 Windows Boot Manager
--------------------
identifier              {bootmgr}
device                  partition=D:
path                    \bootmgr
description             Windows Boot Manager
locale                  en-US
default                 {current}
displayorder            {current}
timeout                 30

Windows Boot Loader
-------------------
identifier              {7378d098-b723-11e0-a59f-c12e7e982394}
device                  partition=C:
path                    \Windows\system32\winload.exe
description             Windows 7
locale                  en-US
inherit                 {bootloadersettings}
recoverysequence        {7378d099-b723-11e0-a59f-c12e7e982394}
recoveryenabled         Yes
osdevice                partition=C:
systemroot              \Windows
resumeobject            {7378d097-b723-11e0-a59f-c12e7e982394}
nx                      OptIn

Windows Boot Loader
-------------------
identifier              {7378d099-b723-11e0-a59f-c12e7e982394}
device                  ramdisk=[C:]\Recovery\7378d099-b723-11e0-a59f-c12e7e982394\Winre.wim,{7378d09a-b723-11e0-a59f-c12e7e982394}
path                    \windows\system32\winload.exe
description             Windows Recovery Environment
inherit                 {bootloadersettings}
osdevice                ramdisk=[C:]\Recovery\7378d099-b723-11e0-a59f-c12e7e982394\Winre.wim,{7378d09a-b723-11e0-a59f-c12e7e982394}
systemroot              \windows
nx                      OptIn
winpe                   Yes

Windows Boot Loader
-------------------
identifier              {current}
device                  partition=C:
path                    \Windows\system32\winload.exe
description             Windows 7 Professional (recovered)
locale                  en-US
recoverysequence        {7378d099-b723-11e0-a59f-c12e7e982394}
recoveryenabled         Yes
osdevice                partition=C:
systemroot              \Windows
resumeobject            {4d416039-b722-11e0-8d65-806e6f6e6963}

Resume from Hibernate
---------------------
identifier              {4d416039-b722-11e0-8d65-806e6f6e6963}
device                  partition=C:
path                    \Windows\system32\winresume.exe
description             Windows 7 Professional (recovered)
locale                  en-US
inherit                 {resumeloadersettings}
filedevice              partition=C:
filepath                \hiberfil.sys
debugoptionenabled      No

Resume from Hibernate
---------------------
identifier              {7378d097-b723-11e0-a59f-c12e7e982394}
device                  partition=C:
path                    \Windows\system32\winresume.exe
description             Windows Resume Application
locale                  en-US
inherit                 {resumeloadersettings}
filedevice              partition=C:
filepath                \hiberfil.sys
debugoptionenabled      No

Windows Memory Tester
---------------------
identifier              {memdiag}
device                  partition=D:
path                    \boot\memtest.exe
description             Windows Memory Diagnostic
locale                  en-US

EMS Settings
------------
identifier              {emssettings}
bootems                 Yes

Debugger Settings
-----------------
identifier              {dbgsettings}
debugtype               Serial
debugport               1
baudrate                115200

RAM Defects
-----------
identifier              {badmemory}

Global Settings
---------------
identifier              {globalsettings}
inherit                 {dbgsettings}
                        {emssettings}
                        {badmemory}

Boot Loader Settings
--------------------
identifier              {bootloadersettings}
inherit                 {globalsettings}
                        {hypervisorsettings}

Hypervisor Settings
-------------------
identifier              {hypervisorsettings}
hypervisordebugtype     Serial
hypervisordebugport     1
hypervisorbaudrate      115200

Resume Loader Settings
----------------------
identifier              {resumeloadersettings}
inherit                 {globalsettings}

Device options
--------------
identifier              {7378d09a-b723-11e0-a59f-c12e7e982394}
description             Ramdisk Options
ramdisksdidevice        partition=C:
ramdisksdipath          \Recovery\7378d099-b723-11e0-a59f-c12e7e982394\boot.sdi
Edit: 10/12/2013: OR, you can simply install something like Mini Tool Partition Wizard, and extend the System reserved partition. I did that today, took me 2 minutes. Expanded a 500 MB to 1 GB, I don’t care about space in that computer that much, and it allowed me to save an image.
