Monthly Archives: November 2011

Solid State Drives and Defragmentation

As covered earlier in this article, Solid State Drives “don’ts” include the advice not to defragment them, for technical reasons. But Diskeeper Corporation, the makers of the defragmenting software with the same name, have claimed they have a product that not only is not detrimental to a solid state drive, but that specifically benefits them. The product is called Hyperfast.

Since I like to put claims like the above to the test, I decided to download a trial of Diskeeper Pro 2011, and see what it can do for the 9 months old Solid State Drive in my Windows Vista based laptop. This laptop is my main computer. All my web browsing, email handling through Outlook and even its SQL server based Business Contact Manager are handled from this laptop. So 9 months of constant use with no defragmentation whatsoever should make for some good wear and tear. Let’s see what Diskeeper can do for it now.

I of course have some saved screen shots of the solid state drive’s performance graph from when I got it and it was brand new, and I recently took new ones when handling another aspect of its optimization. So, we have the before pictures. Let’s see what the after pictures look like. But first, let’s install and run that Diskeeper software.

I installed and launched Diskeeper Pro 2011 (which includes Hyperfast). To be honest, it was a little confusing for me to navigate around, so I know the average user will probably be a little lost. But I digress. Or maybe not, since the point is, I wanted to make sure Hyperfast was enabled for my solid state drive, and it took a bit of looking around to do so. OK so Diskeeper knows my hard drive is a solid state one. Awesome. Now let’s have it optimize it, using all recommended settings, and then we’ll do a test or two to see if any improvements in read/write performance.

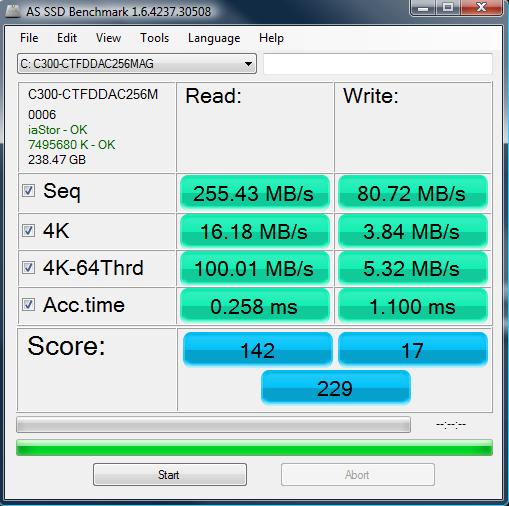
After letting it operate overnight, my solid state drive became “optimized”. So now for the speed performance tests. Although I traditionally use HD Tune to test the performance of hard drives, this time I used “As SSD”, because it’s reportedly a better benchmark for solid state drives. The numbers in the Score section are the ones to look at. This is the before-using-Diskeeper results:


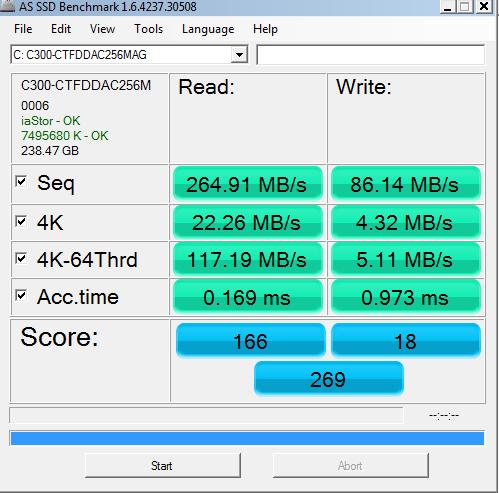
And here’s the after-using-Diskeeper one:


I must confess I was surprised to see the outcome of these tests. My initial guess was there wasn’t going to be an improvement or very little, if any. Instead, well, the numbers speak for themselves. Slight improvement in write times, considerable improvement in read times, for an overall improvement of the total score from 229 to 269. So while not as wild as the performance increase results reported by Diskeeper, there is a definite benefit from using Diskeeper’s product on a solid state drive, based on the above results.
Test Drive – F-Secure Total Security 2012

This week’s test drive is the recently released F-Secure Total Security 2012. As usual, upon installing it and updating its signature file, I proceeded to throw the computer at malicious websites to see how effective F-Secure was in thwarting the malware therein.

First round: downloaded a program right out of a Russian website, and emulating a gullible computer user, proceeded trying to open the program just downloaded. F-Secure real-time protection module jumped, blocked it from opening, alerted me to its existence, and nuked it. A posterior in-depth analysis revealed the program was indeed never allowed to open, so no damage to the computer. First round: Pass.

Second round: A fresh Trojan. Same behavior, same result as first round.

Third round: Another very nasty Trojan, the most frequent type of malware these days. Same result, the real-time protection module didn’t even let the file finish downloading and rendered it harmless. Pass!

Fourth round: A fake antivirus. Same result: No luck in infecting the computer. It became obvious that these attempts to infect the computer were pretty much useless. I actually ran out of malicious websites to throw the computer at! And despite all the efforts, not only did the computer not get infected with any payload, the files containing malware were not allowed to stay in the computer, in fact they weren’t even allowed to arrive at the computer. Because no malicious file was allowed to open (execute), some of the security layers were not even called upon! (Like the firewall).

Conclusion

Similar to my recent review of Lavasoft’s product, F-Secure passed the test but at the cost of some system performance impact: I spotted 12 different processes running in the background when F-Secure is running. That’s a lot of processes for just one program. And even though my test computer is fast, I was able to clearly perceive the performance degradation once F-Secure was installed. So users with old or slow computers might want to stay away.

The updated list of security products that have passed my test follows. The sequence is simply the order in which they have been tested and does not represent any kind of performance score:


1. Kaspersky Internet Security 2012.

2. VIPRE Antivirus Premium.

3. ZoneAlarm Extreme Security Suite 2012.

4. Avira Internet Security Suite 2012.

5. Emsisoft Internet Security Pack.

6. Lavasoft’s Ad-Aware Total Security Suite 2011.

7. F-Secure Total Security 2012.

And remember, any of the above products provide enough protection to keep you safe while surfing the web IF complemented with AppGuard, as laid out in my article from over 2 years ago on the subject.


Not for Beginners – Using a Sony Vaio Recovery Environment Partition to Restore to Factory Defaults

This was done on a Sony Vaio laptop, model VGN-NR180E. Somebody had done a clean install of a pirated copy of Windows 7 Ultimate. The laptop came originally with Windows Vista Home Premium. Owner wanted to sell it but first get rid of the pirated OS. No recovery disks were available. The recovery environment partition was, fortunately, intact. How to invoke it without recovery disks?

Nothing could be easier. Just order the recovery disks. Just kidding. But before I tell you what to do, let me disclaim it: Make sure you don’t need the data in your current working partition (Or you have backed up the data/files/documents you need from it), because if something goes wrong you might not be able to access the data anymore, and if everything goes the way it should, you CERTAINLY WON’T be able to access your data when done, since the purpose of using the recovery partition is to restore the computer to factory state, thus irreversibly and destructively overwriting everything in your current system partition.

Open an elevated command prompt, type diskpart and press enter. Now assign the hidden recovery partition a letter by using the assign command. Good. Now make it the active partition with the active command. Google how to do these, as I don’t want to make this a tutorial about the diskpart command.

Reboot the computer and it will boot to the Vaio recovery environment. From there you can make the appropriate menu selections to get the back-to-factory-state restoring process going.

Hope this helps.